Objective-c SDK
Introduction
Target most up-to-date API base URL
We encourage you to always target the most up-to-date API base URL when sending requests to our platform. Have a look at our dedicated guide for a full overview.
To allow you a smooth transition, previous API base URLs remain available until further notice.
Our native SDK helps you communicate with the Client API. It offers:
- Convenient wrappers for API responses.
- Handling of all the details concerning the encryption of payment details.
- Caching of payment product logos and caching of images to offer additional information about payment products.
- Localisation of various labels and messages.
- User-friendly formatting of payment data such as card numbers and expiry dates.
- Validation of input.
- Checks to determine to which issuer a card number is associated.
Our example app simulates the user interface for the whole payment flow based on the interaction between the app and our platform. Find the source code of the SDK and the example app on GitHub, including installation instructions.
To understand how to use this SDK, have a look at the following documentation:
- Mobile/Client Integration – familiarise yourself with various concepts.
- Client API Reference – the SDK wraps the Client API and (among other things) exposes the responses of the webservice calls as objects. Understanding the Client API will help you understand these SDK objects as well.
- The SDK on GitHub – the SDK contains a working example application which can help you understand how the SDK is best used.
- This current document will help you understand the global flow when creating payment pages using the SDK.
Once you are all set, read the next chapters on how to prepare and use the SDK.
Integrate SDK with project
For development and testing purposes, you can use our API Explorer. It allows you to easily query our Server API. We do not recommend using it on the live environment.
To create payments, you need to integrate the SDK with your project at first. All versions of the SDK are publicly available in our repository. To simplify their use, we have prepared a package below for quick integration.
The SDK is available via package managers: CocoaPods or Carthage.
CocoaPods
You can add the SDK as a pod to your project by adding the following code snippet to your Podfile:
$ pod 'OnlinePaymentsSDK'
Then, run the following command:
$ pod installCarthage
You can add the SDK with Carthage by adding the following code snippet to your Cartfile:
$ github "wl-online-payments-direct/sdk-client-objc"
Then, run the following command:
$ carthage updateAfter the successful integration of the SDK with your project, you can proceed to the process of integration with the entire payment system. The complete payment process consists of these steps:
- Initialisation of Session and PaymentContext objects
- Receiving possible payment methods
- Receiving and displaying payment method details
- Validation of provided data
- Encryption and transfer of payment data
- Finalising transaction
1. Initialise OPSession and OPPaymentContext objects
Firstly, you need to create a OPSession enabling communication between the Server API and the client. Your app must have its own server, acting as an intermediary between our Client and Server API.
Since the customer initiates the payment in their app, the Client application asks the Server application to create a Session. When a Server application receives a request, it can create a Session via Create Session from the Server SDK.
Try our API Explorer to send a CreateSession request.
After configuring and connecting your application to the Server API, you receive a response containing information about the created Session. A typical response looks like this:
{
    "assetUrl": "https://assets.test.cdn.v-psp.com/s2s/515c2c0bd13d5dd4bd42",
    "clientApiUrl": "https://payment.preprod.direct.worldline-solutions.com/",
    "clientSessionId": "68a4b0b183a34016b4b694b97938f75b",
    "customerId": "cf7d7aafd42e4a1cb9e4b0624a5041b1",
    "invalidTokens": []
}
Now pass assetUrl, clientApiUrl, clientSessionId and customerId to the Client application. Once the application receives a response from the Server application with information about the Session, create a local Session object on the Client application side.
Next, create a OPPaymentContext object. It contains information about the form of payment, currency, country, amount, etc. You will use the OPPaymentContext and OPSession objects throughout the payment process.
There are different payment methods available for different PaymentContext objects. If you change any variable, you will have to start the process again. Only the Session can remain the same if the payment is made with the same consumer.
2.Receive possible payment methods
The next step is to get and display the possible payment options. To do so, use the previously created OPSession and OPPaymentContext to invoke the GetBasicPaymentItems method which sends GetPaymentProducts to our Server API.
Have a look at the code sample showing how to initialise an instance of OPPaymentContext class and use it to get the OPBasicPaymentItems list with the OPSession object.
NSInteger amountValue = 100;
NSString *countryCode = @"NL";
NSString *currencyCode = @"EUR";
BOOL isRecurring = NO;

OPPaymentAmountOfMoney *amountOfMoney = [[OPPaymentAmountOfMoney alloc] initWithTotalAmount:amountValue currencyCode:currencyCode];

OPPaymentContext *context = [[OPPaymentContext alloc] initWithAmountOfMoney:amountOfMoney isRecurring:isRecurring countryCode:countryCode];

[session paymentItemsForContext:context groupPaymentProducts: NO success:^(OPPaymentItems *paymentItems) {
    // Allow the customer to select a payment item and an optional
    // account on file from the list of payment items
    // represented by paymentItems.
} failure:^(NSError *error) {
    // Indicate that an error has occurred.
}];
3. Receive and display payment method details
Payment items are instances of OPBasicPaymentProduct. Your app can use these items to create a screen that lists them all. Use our convenient example application as a basis for your own implementation.
f you are fine with the look-and-feel of the example app, you do not need to make any changes. If you only have one payment item, you can skip this screen. However, you might also want to display the AccountOnFile selection.
For some payment products, customers can indicate that they want our platform to store their credentials for recurring payments. We refer to the stored data as an account on file or token. You can reuse this account on file / token for subsequent payments if your customers chose the same payment method.
The list of available payment products that the SDK receives from the Client API also contains the accounts on file for each payment product. Your application can present this list to the user.
Depending on the method chosen by the customer, consider cases of different data flows:
If the user has chosen a native form of payment, you need to use the SDK of the payment provider and handle the response only in the last step to inform the user about the payment status. Read more about native payments in the dedicated chapter.
For payments with a third-party payment provider, you receive data with the redirection address in the payment properties. Redirect your customers in their browser to the third-party payment portal to continue the payment process. After the successful payment, your app needs to handle the redirection to the Client app.
The standard payment process is a card payment. Once your customers have selected a payment item or a stored account on file, the Client SDK can request the necessary information your customers needs to provide for the payment.
An object representing the OPBasicPaymentItem payment method provides a list of the fields your app needs to render, including displaying hints and validation rules. If your customers select an account on file, information already available can be prefilled in the input fields instead of requesting it from your customers. The prefilled data on behalf of the customer is in line with applicable regulations. Depending on the individual use case, your customers still might have to provide some data (i.e. the CVC).
4. Validate provided data
Now your application needs to validate the data your customers enter in your application’s interface. To do so, use the data validation component. The data entry interface must be fully transparent and understandable for your customers. We recommend OPToolTips, which have individual fields or display appropriate validation errors. The SDK’s localisation component translates the content into the desired customer’s language.
5. Encrypt and transfer payment data
Based on the collected data, you need to create a OPPaymentRequest instance. This class has a tokenize property used to indicate whether the app should store the customer’s credentials for recurring payments.
Use the following code sample for payment requests without accounts on file:
OPPaymentRequest *paymentRequest = [[OPPaymentRequest alloc] init];
paymentRequest.paymentProduct = paymentProduct;
paymentRequest.accountOnFile = nil;
paymentRequest.tokenize = NO;
Alternatively, adapt the code sample by supplying both the account on file and the corresponding payment product:
paymentRequest.accountOnFile = accountOnFile
Once you configure a payment request, supply the values for the payment product fields. Use the identifiers of the fields, such as "cardNumber” and "cvv" to set the field values for the payment request:
[paymentRequest setValue:@"1234567890" forField:@"cardNumber"];
[paymentRequest setValue:@"123" forField:@"cvv"];
Now you can validate the payment request. As a result, a list of errors is available. For any validation error, you need to provide feedback to the customer. For more information, read the dedicated chapter.
[self.paymentRequest validate];
if (self.paymentRequest.errors.count == 0) {
    // The payment request is valid, and can be encrypted and sent to
    // our platform via the merchant's server.
} else {
    // Notify the customer that some fields contain invalid data.
}
After the PaymentRequest validation, encrypt the request and send it to your Server application. Have a look at the code sample showing how to use an instance of OPSession to encrypt a request:
[session preparePaymentRequest:paymentRequest
    success:^(OPPreparedPaymentRequest *preparedPaymentRequest) {
        // Submit the information contained in the encrypted
        // payment request represented by preparedPaymentRequest
        // to our platform via your server.
    } failure:^(NSError *error) {
        // Indicate that an error has occurred.
    }
];
See a more detailed description of the encryption process in the dedicated chapter.
6. Finalise transaction
After receiving the encrypted data, pass it to your server application to finalise the payment by sending a CreatePayment request.
The response may require additional actions from the Client specified in the MerchantAction object. In most cases, this involves redirecting the customer to an external party (i.e. for a 3-D Secure check). Once your customers complete this check, our platform processes the actual transaction. Read the Server SDK documentation for more information.
Finally, you have to pass the information to the Client application to display the transaction result to your customers.
Find a full overview of the payment flow in the Mobile/Client Integration guide.
Understand SDK objects
The SDK includes several objects. Choose the object of your interest from the list below to read more about it:
- OPC2sCommunicator
- OPSession
- OPPaymentContext
- OPBasicPaymentItem interface
- OPAccountOnFile
- OPDisplayHints
- OPPaymentRequest
- OPPreparedPaymentRequest
- OPResponses
OPC2sCommunicator
This is the main communication service. You do not use it directly, but only through the Session object. It creates a secure connection with our Client API.
OPSession
OPSession is the main component of the SDK. The object
- Wraps C2sCommunicator implementing all communication logic with our Client API.
- Creates proper API requests.
- Is responsible for converting the responses of the API into plain native objects.
- Has built-in encryption of native objects describing the payment request in a way our Server API can process it.
Make sure to initialise Session properly to start communication with our Client API. The mandatory properties are
- client session identifier
- customer identifier
- client-api-url
- asset-base-url
You will get these parameters using the CreateSession from the Server API endpoint. Refer to the Server SDKs and the Server API to learn more.
The OPC2sCommunicatorConfiguration class has static methods to initialise Session.
NSString *clientSessionId = @"1234";
NSString *customerId = @"5678";
NSString *clientApiURL = @"https://clientapi.com";
NSString *assetBaseURL = @"https://asset.com";
NSString *appIdentifier = @"Example Application/v1";

OPSession *session = [OPSession sessionWithClientSessionId:clientSessionId customerId:customerId baseURL:clientApiURL assetBaseURL:assetsBaseURL appIdentifier:kOPApplicationIdentifier];
Make sure to determine whether the application is running in production and specify the application identifier during the initialisation. An additional parameter specifies the IP address. The IP address and application identifier are used in the Device Metadata when communicating with the Client API.
| Properties |
|---|
|
Device Metadata
The Device Metadata includes the following data:
| Properties |
|---|
|
OPPaymentContext
Instances of the OPPaymentContext class contain the most relevant payment information such as:
- OPamountOfMoney
- currency
- countryCode
- isRecurring – an indication of whether the payment is a single payment or a recurring payment
This object:
- Takes part the next steps of the transaction.
- Should remain in the same form after initialisation – you should use the same object through the entire transaction process.
OPAmountOfMoney
This model contains information about the payment amount. It consists of the amount expressed in the long type and the currency given as currencyCode.
Note that amount includes currency fractions. The object below is equal to 1 EUR.
amountOfMoney": {
            "amount": 100,
    "currencyCode": "EUR"
        },
OPBasicPaymentItem interface
The main interface of BasicPaymentItem is primarily responsible for the identification and easy visual presentation of the payment item. It has:
- An Id identifier.
- A DisplayHints list which contains the visual text ad (e.g., a logo or the picture of the card with CVC marked).
- A distinguishing feature of the payment method (e.g., a logo).
- Information about related AccountOnFile instances.
OPBasicPaymentProduct
The main model of a payment product. It contains a list of available payment methods. The customer can select one method from this list. Each instance contains:
- An identifier.
- A field indicating the payment method of this product.
- Two fields that indicate the minimal and maximal amount required to pay with this payment product.
- A field indicating whether our platform can store the payment data as an account on file for subsequent payments.
- A field indicating whether the method allows recurring payments.
- A field indicating whether the payment method uses redirection to a third party.
- A list of previously saved accounts on file for this payment product.
- Displays hints to render the OPBasicPaymentProduct appropriately, containing:
- An index indicating at which position the payment product belongs in a list of payment products
- A label
- A logo
OPPaymentProduct
It extends the OPBasicPaymentProduct class and implements the OPPaymentItem interface that supplements the model with the OPPaymentProductField list. However, once the customer selects a payment item or an account on file, they must provide additional information (i.e. an address, a bank account number, a credit card number, or an expiry date) to process the actual payment.
Each payment item can have several fields that the customer needs to complete for processing payments. Instances of OPPaymentProductField represent information about the fields of payment items. Use it to retrieve instances of OPPaymentProduct:
// Get selected OPPaymentProduct

[session paymentProductWithId:paymentProductId context:context
    success:^(OPPaymentProduct *paymentProduct) {
        // Create a payment request using the payment product represented by paymentProduct.
    } failure:^(NSError *error) {
        // Indicate that an error has occurred.
    }
];

// Get all available OPBasicPaymentItems for paymentContext

[session paymentItemsForContext:context groupPaymentProducts: NO success:^(OPPaymentItems *paymentItems) {
    // Allow the customer to select a payment item and an optional
    // account on file from the list of payment items
    // represented by paymentItems.
} failure:^(NSError *error) {
    // Indicate that an error has occurred.
}];
OPPaymentProductField
It represents fields of payment items. Each field has:
- An identifier
- Type
- A definition of restrictions that apply to the value of the field
- Information about how to present the field to the customer in the user interface
The model has a built-in data validation method to determine whether a given value is valid for the field. The method is based on OPDataRestrictions. It returns OPValidationErrorMessages and methods for masking and uncasting the value by means of the built-in StringFormatter.
The code snippet below shows how to retrieve the field with the "cvv" identifier from a payment product. In this process, we:
- Inspect the data restrictions of the field to see whether this field is required or optional.
- Inspect the display hints of the field to see whether the values a customer provides should be obfuscated in a user interface.
- Validate the value "123".
- Inspect the number of validation errors to see whether the provided value is valid.
OPPaymentProductField *field = [paymentProduct paymentProductFieldWithId:@"cvv"];
BOOL isRequired = field.dataRestrictions.isRequired;
BOOL obfuscate = field.displayHints.obfuscate;
[field validateValue:@"123"];
BOOL validValue = field.errors.count == 0;
OPAccountOnFile
OPAccountOnFile represents information about an account on file for a certain payment product. It contains:
- An identifier for the account on file.
- An identifier for the corresponding payment product.
- A collection of key-value pairs stored as a part of the account on file.
- Display hints that contain information about how to render the account on file.
- A method that produces a label describing the account on file.
Retrieve instances of OPAccountOnFile as instances of OPBasicPaymentProduct as follows:
OPDisplayHints
OPDisplayHints are objects containing hints. There are three types of OPDisplayHints:
- OPDisplayHintsPaymentItem: The most important information about OPPaymentItem, i.e., a name and a logo. An additional property is displayOrder which indicates the appropriate display order according to the order index in relation to other OPPaymentItems used by OPBasicPaymentItems and OPBasicPaymentProducts. Use them to display the OPPaymentItem selection list
- OPDisplayHintsAccountOnFile: The list containing the OPProductFields key-value pairs and the corresponding mask to apply the mask (e.g. asterisks) to the corresponding value from OPAccountOnFile
- OPDisplayHintsProductFields: Defines the way of displaying OPProductFields. In addition to the name and placeholder, it contains OPPreferredInputType, based on which you can choose:
- The appropriate type of keyboard you should use.
- Whether the element must always be displayed as AlwaysShow.
- Whether the Obfuscate value should be obfuscated, as well as the value of Mask – a reference to the assigned OPToolTip and OPFormElement.
OPToolTips
OPToolTips facilitate data entry. You can add a ToolTip object in the display hints for ProductFields. It can contain an explanation text or a graphic, i.e. a photo of a card with an obfuscated CVV.
OPFormElement
A simplified description of the visual element instructing you to use it appropriately as either text, list, currency, date or boolean.
OPPaymentRequest
This class wraps the relationship between the selected OPPaymentProduct, OPAccountOnFile and the entered values. It allows you to easily extract masked or unmasked values. It contains a method of validating the entered data. Check the dedicated encryption chapter for more information.
OPPreparedPaymentRequest
The instance of OPPreparePaymentRequest class is the result of encrypting a request using an instance of OPSession. It has two properties, encryptedFields and encodedClientMetaInfo – the strings that should be sent to our platform. Check the dedicated encryption chapter for more information.
Responses
- ApiResponse: Each query is wrapped in a response API containing generic data. In case of any error, in the additional ErrorResponse field, you can find ApiErrorCode and Message describing the error.
- OPPublicKeyResponse: Client API you use to retrieve a transaction-specific public key from our server. Use it to encrypt sensitive data, i.e. card details. This object automatically returns an already decrypted public key from our API.
Use additional features
The SDK has a lot more to offer. Have a look at the following features, as they will help you build the perfect solution.
- Encrypt sensitive data
- Validate data
- Apply IIN check
- Implement native payments
- Use OPAssetManager
- Localise app
- Use Logging
- Use demo application
Encrypt sensitive data
One of the biggest assets of the SDK is its encryption tool. It offers great security when transferring sensitive data (i.e. card numbers, expiry date, CVC code). An entire encryption/transfer flow looks like this:
You do not need to do all this steps on your own. Thanks to the SDK, your tasks are as follows:
- When your customers completes all the required payment inputs and confirms the payment, create the OPPaymentRequest object, assign the selected OPPaymentProduct to it and fill it with the entered values.
- Validate the created OPPaymentRequest using the Validate method.
- If there are no validation errors, use a Session object and call the OPPreparePaymentRequest method. It will carry out the entire encryption process for you and return the encrypted data.
- Send the encrypted data to your server.
- Your server sends the encrypted data using the CreatePayment method in the request body field – encryptedCustomerInput.
- You send the transaction result to the client application.
Do not store the encrypted data. Instead, transfer it via the Server API directly to our platform right after the encryption.
The algorithm used is RSA-OAEP with A256CBC-HS512 encoding. It is possible to implement your own encryption, but you will miss the helper functionality that encryptor offers. We do not guarantee correct operations as a result of poorly encrypted data. Note that we are not able to check encrypted data for errors. Therefore, you should make sure that all previous operations have been carried out correctly.
Although it is possible to use your own encryption algorithms to encrypt a payment request, we advise you to use the encryption functionality offered by the SDK.
Validate data
Each OPaymentProductField has appropriate OPDataRestrictions. The OPDataRestrictions object contains information about all mandatory fields and validates whether values entered meet the correctness condition. Together with a list of abstract validators, it has also a property isRequired informing whether given restrictions are required or not.
You can validate a particular input just as easy as through the OPaymentRequest validation. In case of any errors, the Errors field will display a list of errors.
It contains following validators:
- Expiration Date: Checks whether the entered card expiration date is not earlier than the current date and whether it is not beyond the range of twenty-five years ahead.
- Email Address: Checks the format of the email address the customer has provided.
- Fixed List: Checks whether the entered value is on the list of possibilities.
- IBAN: Validates the IBAN the customer has provided.
- Length: Checks if the entered value is longer than the minimum value and if it is not longer than the maximum value.
- Luhn: The checksum formula used to validate a variety of identification numbers, such as credit card numbers.
- Range: Checks if the value is greater than the minimum value and if it is not greater than the maximum value.
- Regex: Validates that the entered value matches the regular expression.
- TermsAndConditions: The boolean validator for the terms and conditions accept field.
Each validator returns an appropriate error, indicating a field that does not meet the conditions, and a message you can easily translate using localisation.
Apply IIN check
The first eight digits of a payment card number are known as the Issuer Identification Number (IIN).
Our API allows the IIN to have at least six digits.
You can use an instance of OPSession to check which payment products are associated with an IIN. The check is performed asynchronously, thus the check result is not available immediately. The result is an instance of OPIinDetailsResponse. This class has the following properties:
- paymentProductId: The primary payment product associated with this IIN.
- countryCode: The country code of the primary payment product associated with this IIN.
- status: Type of OPIinStatus that indicates the result of the IIN check. The possible statuses are:
- SUPPORTED: The IIN is associated with a payment product available on our platform.
- UNKNOWN: The IIN is not recognised.
- NOT_ENOUGH_DIGITS: Less than six digits have been provided.
- EXISTING_BUT_NOT_ALLOWED: The IIN is recognised, but it cannot be used for the current payment.
- isAllowedInContext: Indicates whether it is allowed to do a payment with the primary payment product based on the OPPaymentContext
- coBrands: A list of instances of OPIinDetail, which depict co-brands for the current IIN.
It is possible that a single credit card has multiple brands associated to it and is thereby 'co-brandend'. The details of the first payment product your customers can use for making the payment in that context are always stored in the top-level fields of the OPIinDetailsResponse. If co-branding applies, the list of instances of OPIinDetail contains all brands associated with the card, including the payment product that is stored in the top-level fields. Use this list to let the customers choose their preferred brand. If there is only one payment product associated with the credit card, the list of IIN Details is empty.
- (void)doIINLookup {
    NSString *unmasked = [paymentRequest unmaskedValueForField:@"cardNumber"];
    [session IINDetailsForPartialCreditCardNumber:unmasked context:context success:^(OPIINDetailsResponse *response) {
        if (response.status == OPSupported) {
            if (response.coBrands != nil) {
                if ([self isSelectedPaymentProductInCoBrands:response.coBrands] == NO) {
                    [self switchToPaymentProduct:response];
                }
                // EU legislation requires that, in the case of
                // a card with multiple brands, a customer can
                // choose what brand he wants to do the payment with.
                [self showCoBrandNotification];
            }
            else if ([response.paymentProductId isEqualToString:self.paymentProductIdentifier] == NO) {
                [self switchToPaymentProduct:response];
            }
        }
        else {
            //Handle other status codes
        }
    } failure:^(NSError *error) {
        // Indicate that an error has occurred.
    }];
}

-(BOOL)isSelectedPaymentProductInCoBrands:(NSArray *)cobrands {
    for (OPIINDetail *cobrand in cobrands) {
        if ([cobrand.paymentProductId isEqualToString:self.paymentItemIdentifier]) {
            return true;
        }
    }
    return false;
}

- (void)switchToPaymentProduct:(OPIINDetailsResponse *)response {
    if (response.isAllowedInContext) {
        // Switch to the payment product that actually is in the top level
        // Iin Details Response.
        self.paymentItemIdentifier = response.paymentProductId;
    }
    else {
        // Provide the customer with an error message that shows that the
        // credit card number he is entering can currently not be payed with.
    }
}

- (void)showCoBrandNotification() {
    // Show the customer that he may choose another brand to pay with.
}
If the value in the status field is not SUPPORTED, other fields of OPIinDetailsResponse will all be null (or false in case of the isAllowedInContext field).
Implement native payments
By native payments for mobile devices, we mean Google Pay for Android and Apple Pay for iOS devices. Our system supports native payments, but this does not mean that they will be available on every device.
If the user receives a payment product that is responsible for the native payment, the SDK automatically verifies whether the device is able to handle the payment. If the device does not meet the conditions, this payment is hidden. Thanks to this procedure, you, as the user of our product, do not have to worry about verifying the correctness of the operation.
For devices with iOS, you verify whether the system meets the minimum version (8.0) criterion and use the PKPaymentAuthorizationViewController to check whether it is possible to carry out the transaction.
Refer to our Apple Pay guide for more information.
Use OPAssetManager
Each SDK has a built-in OPAssetManager that makes it easy to manage images related to payment products. To reduce the loading time and to provide adequate security in the event of problems with external resources, the SDKs have basic assets attached that are properly mapped to the appropriate payment products. Additionally, the cache mechanism provides increased performance.
OPAssetManager automatically updates the assets when downloading payment products.
You do not need to take any action. SDK updates the assets itself.
Localise app
Our SDK offers labels that have been translated into over fifty languages. Thanks to this, you can easily translate messages, response codes or payment data into content relevant to the end user.
You can find an example of the use of translations in the demo application. Below you may see an example of a translation for the payment product fields.
#define kOPAppLocalizable       @"OPTranslations"

static NSBundle * _sdkBundle;
+ (NSBundle *)sdkBundle {
    if (_sdkBundle == nil) {
        _sdkBundle = [NSBundle bundleWithPath:kOPSDKBundlePath];
    }
    return _sdkBundle;
}

- (NSString *)switchFormRowFromField:(OPPaymentProductField *)field paymentItem:(NSObject

    *)paymentItem
{
    NSString *labelKey = [NSString stringWithFormat: @"gc.general.paymentProducts.%@.paymentProductFields.%@.link.label", paymentItem.identifier, field.identifier];
    NSString *labelValue = NSLocalizedStringWithDefaultValue(labelKey, kOPSDKLocalizable, [OPFormRowsConverter sdkBundle], nil, @"");

    return labelValue;
}
Use logging
In some cases, you may want to turn on logging of the requests and responses that make up the communication with our platform.
You can enable logging by starting AFNetworkActivityLogger at the app startup.
Use demo application
The example app illustrates the possibilities of the SDK and the services our platform offers. Find the source code on GitHub. You can use this code as the basis of your application. The example app consists of four screens:
- The first screen asks for the information necessary to communicate with the Client API and retrieve a list of payment products. This screen should not be part of an actual application in the application store. We provide it to illustrate which information is needed to initialise an instance of IDSession
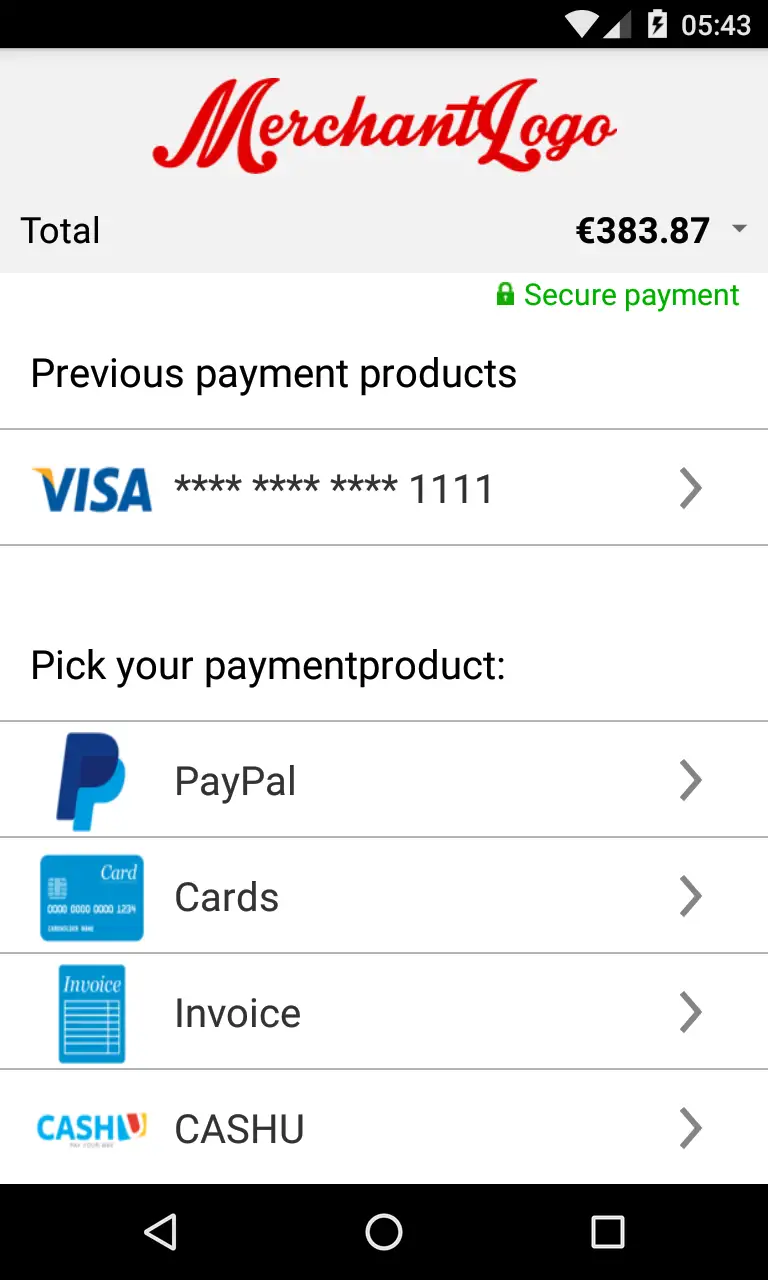
- The second screen is a dynamically generated payment product selection screen. Based on the input provided in the first screen, the app displays a list of available payment products and previously stored accounts on file. This screen or a similar screen would typically be a part of an actual application. See for more details below.
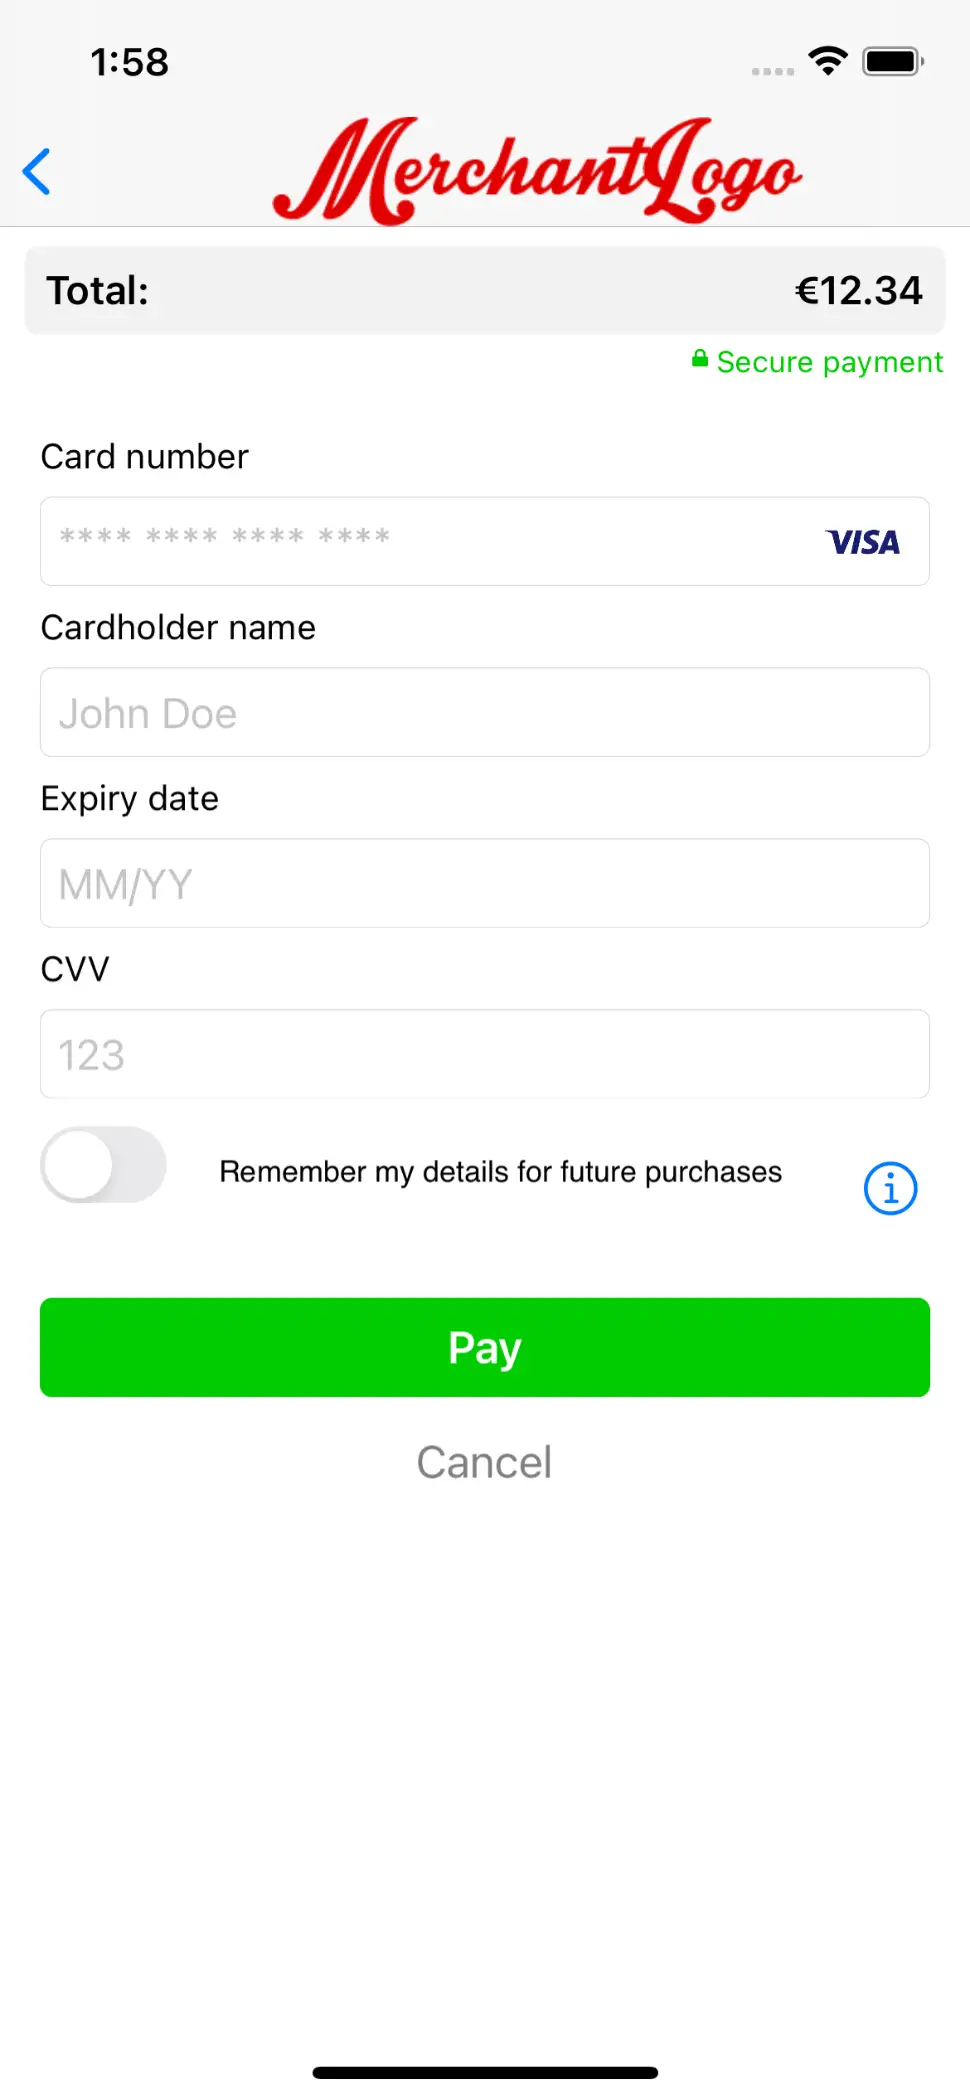
- After selecting a payment product, the app displays the third screen or getting customer input. The customer can only confirm the payment once the SDK has validated the input. Also, this screen or a similar screen would be part of an actual application. See for more details below.
- The fourth screen indicates that the SDK has successfully processed the initiated payment This screen should not be part of an actual app.
Payment product selection screen
The payment product selection screen provides an example for one of the two screens that will appear in most apps using the SDK. It shows a list of available payment items and accounts on file. For each payment item / account on file, it displays a localised name/a short description of the stored information. If a logo is available for a payment item, the screen will display it.
The screen contains a part of a list of available payment items, generated from the information contained in an instance of IDPaymentItems.

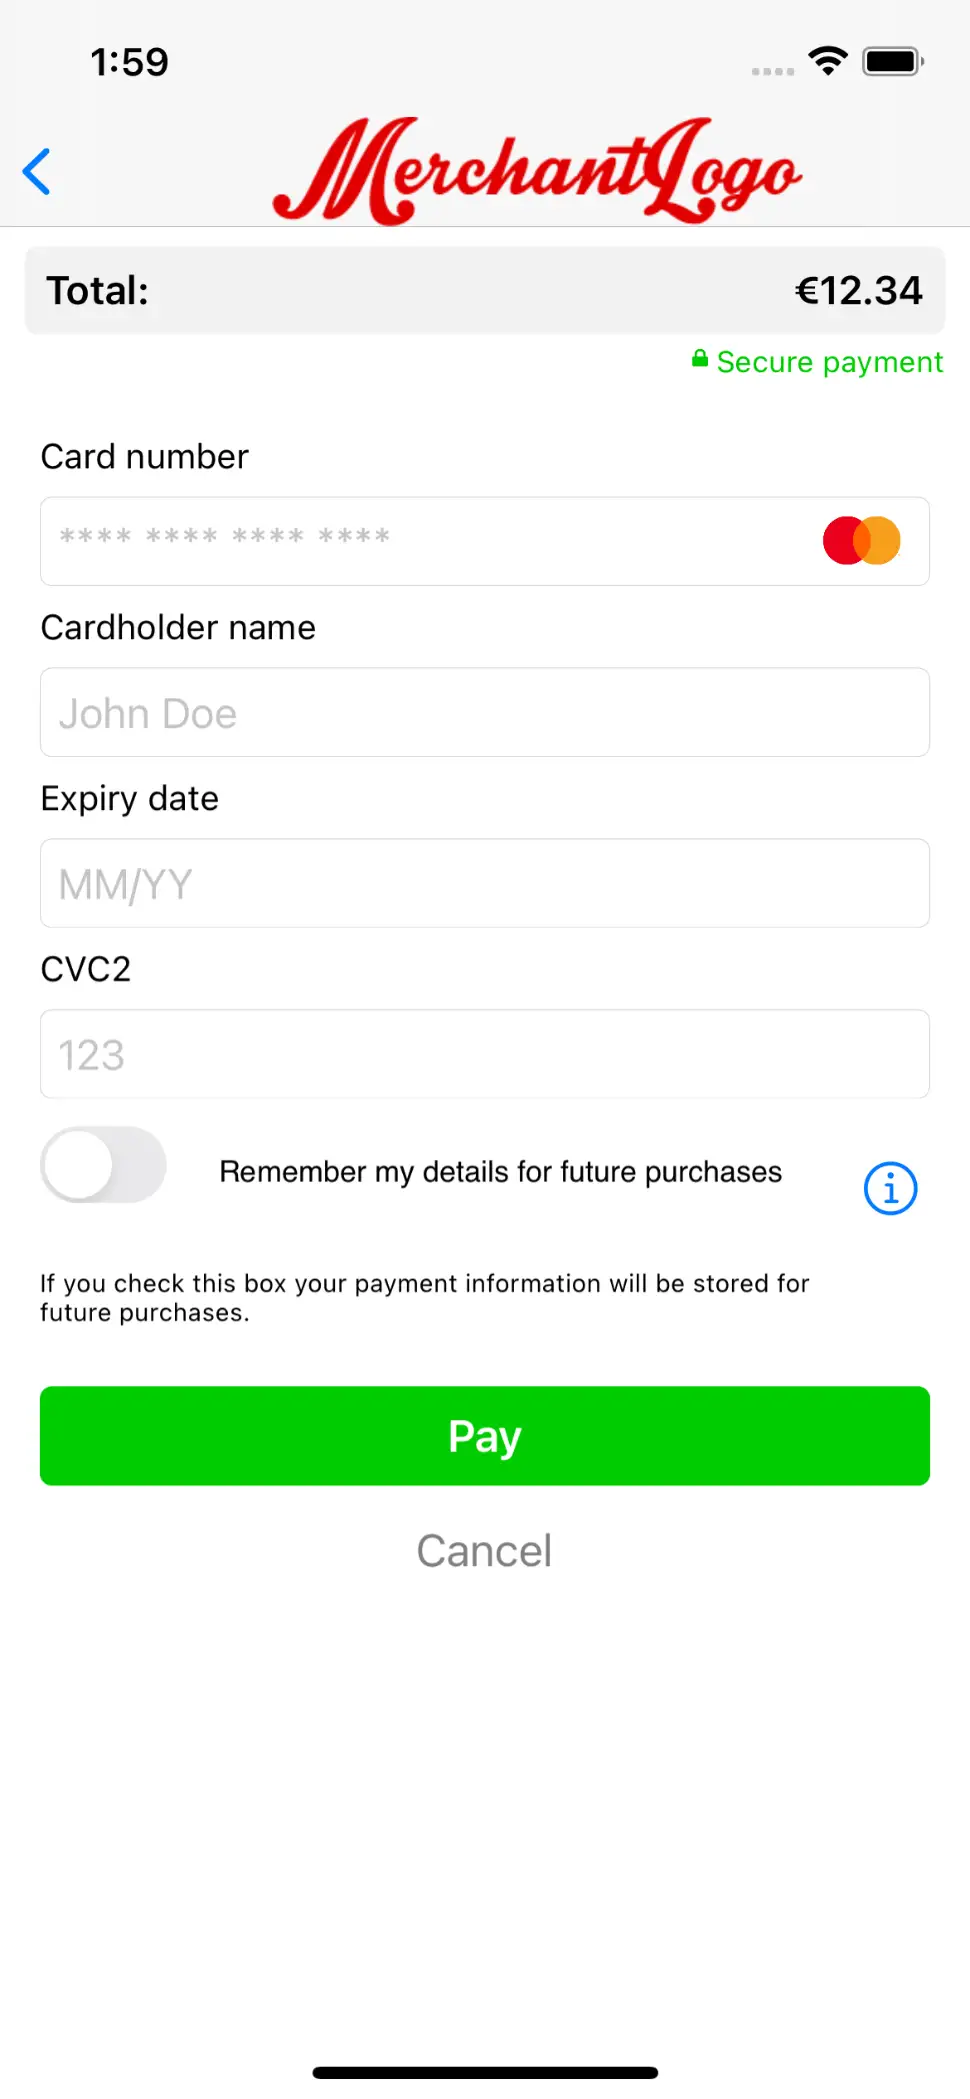
Payment product input form screen
This screen is another example of a screen that will appear in most apps using the SDK. The app displays it after selecting a payment item or an account on file. If the customer has selected an account on file, some of the required values will be prefilled and cannot be changed. The input form is generated from an instance of OPPaymentProduct.
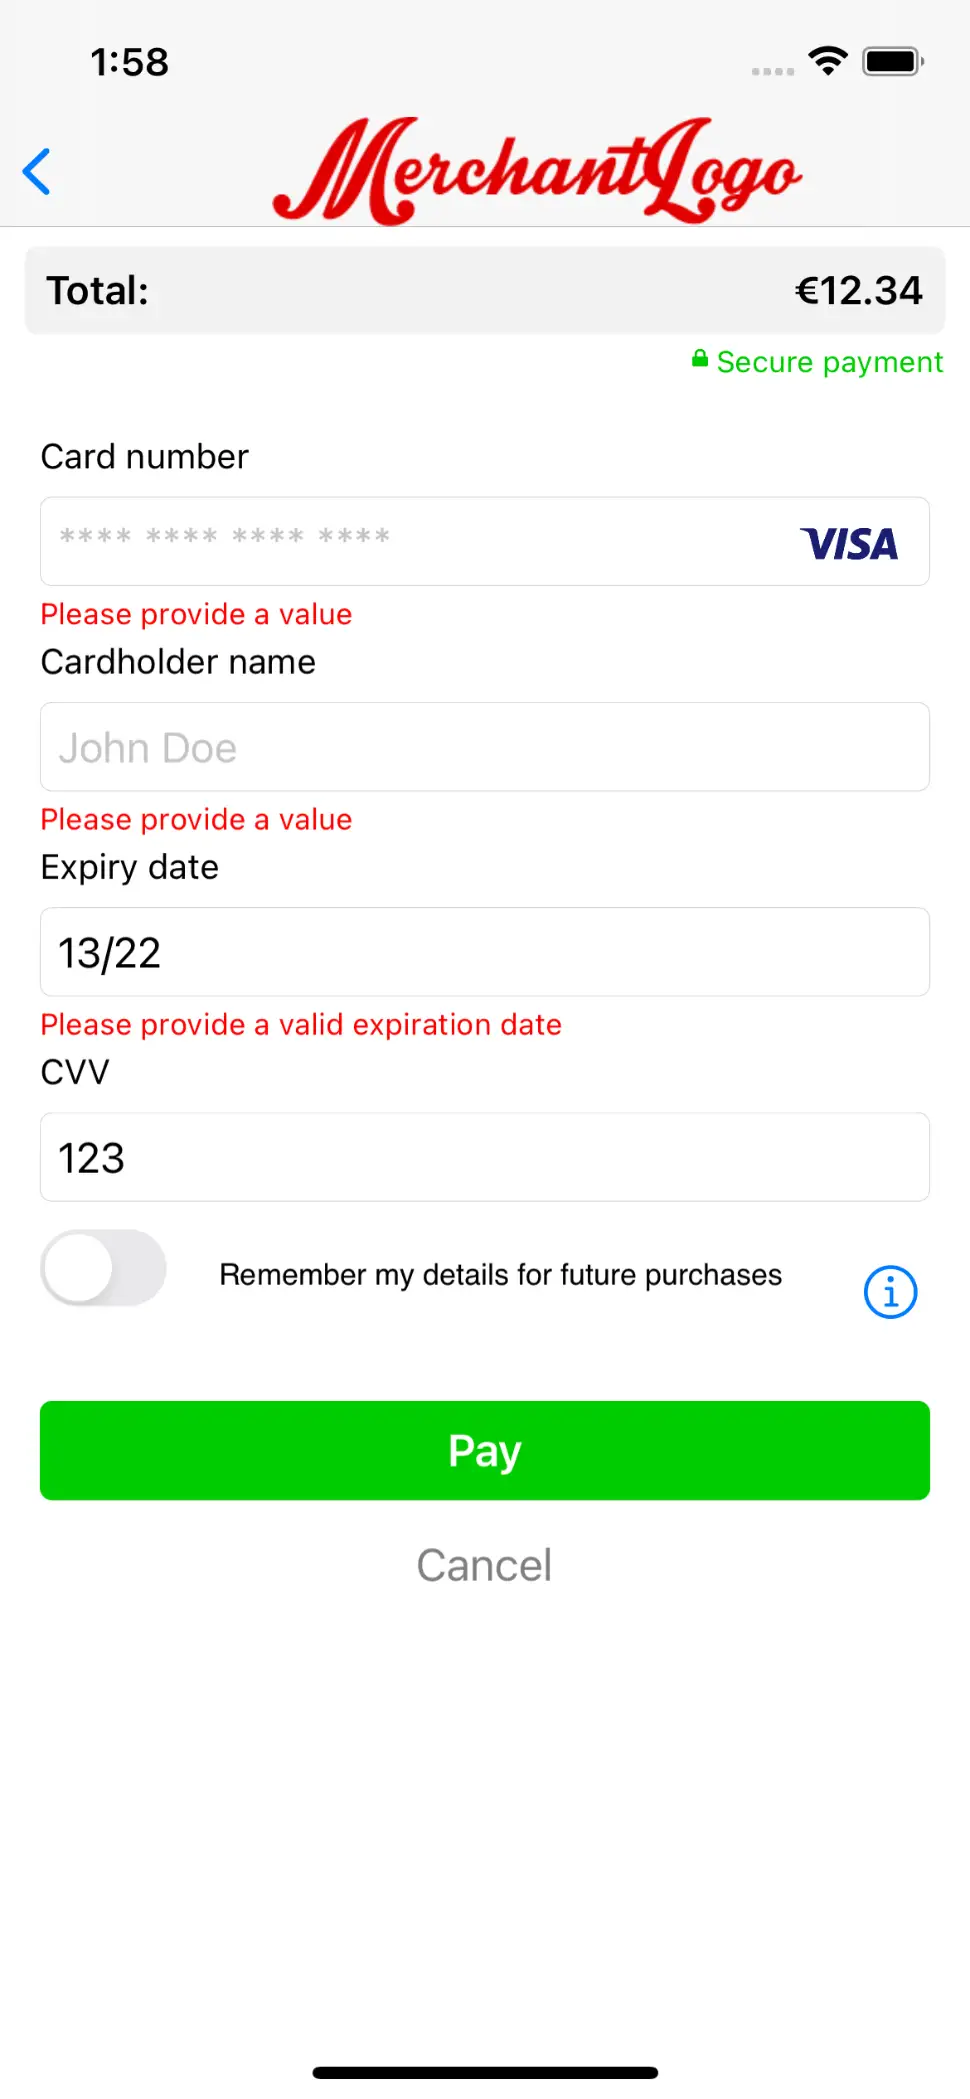
Form validation
The example app uses the SDK to validate the customer input provided when they press the Pay button. If the provided data is invalid, error messages are shown below the invalid values.
Additional information
Some payment product fields might require some additional explanation. The information button next to the text field for the CVV code shown below indicates that additional information is available. The image shown when the customer presses the button is a part of the display hints of the payment product field. The textual explanation is a localised string that is part of the SDK.
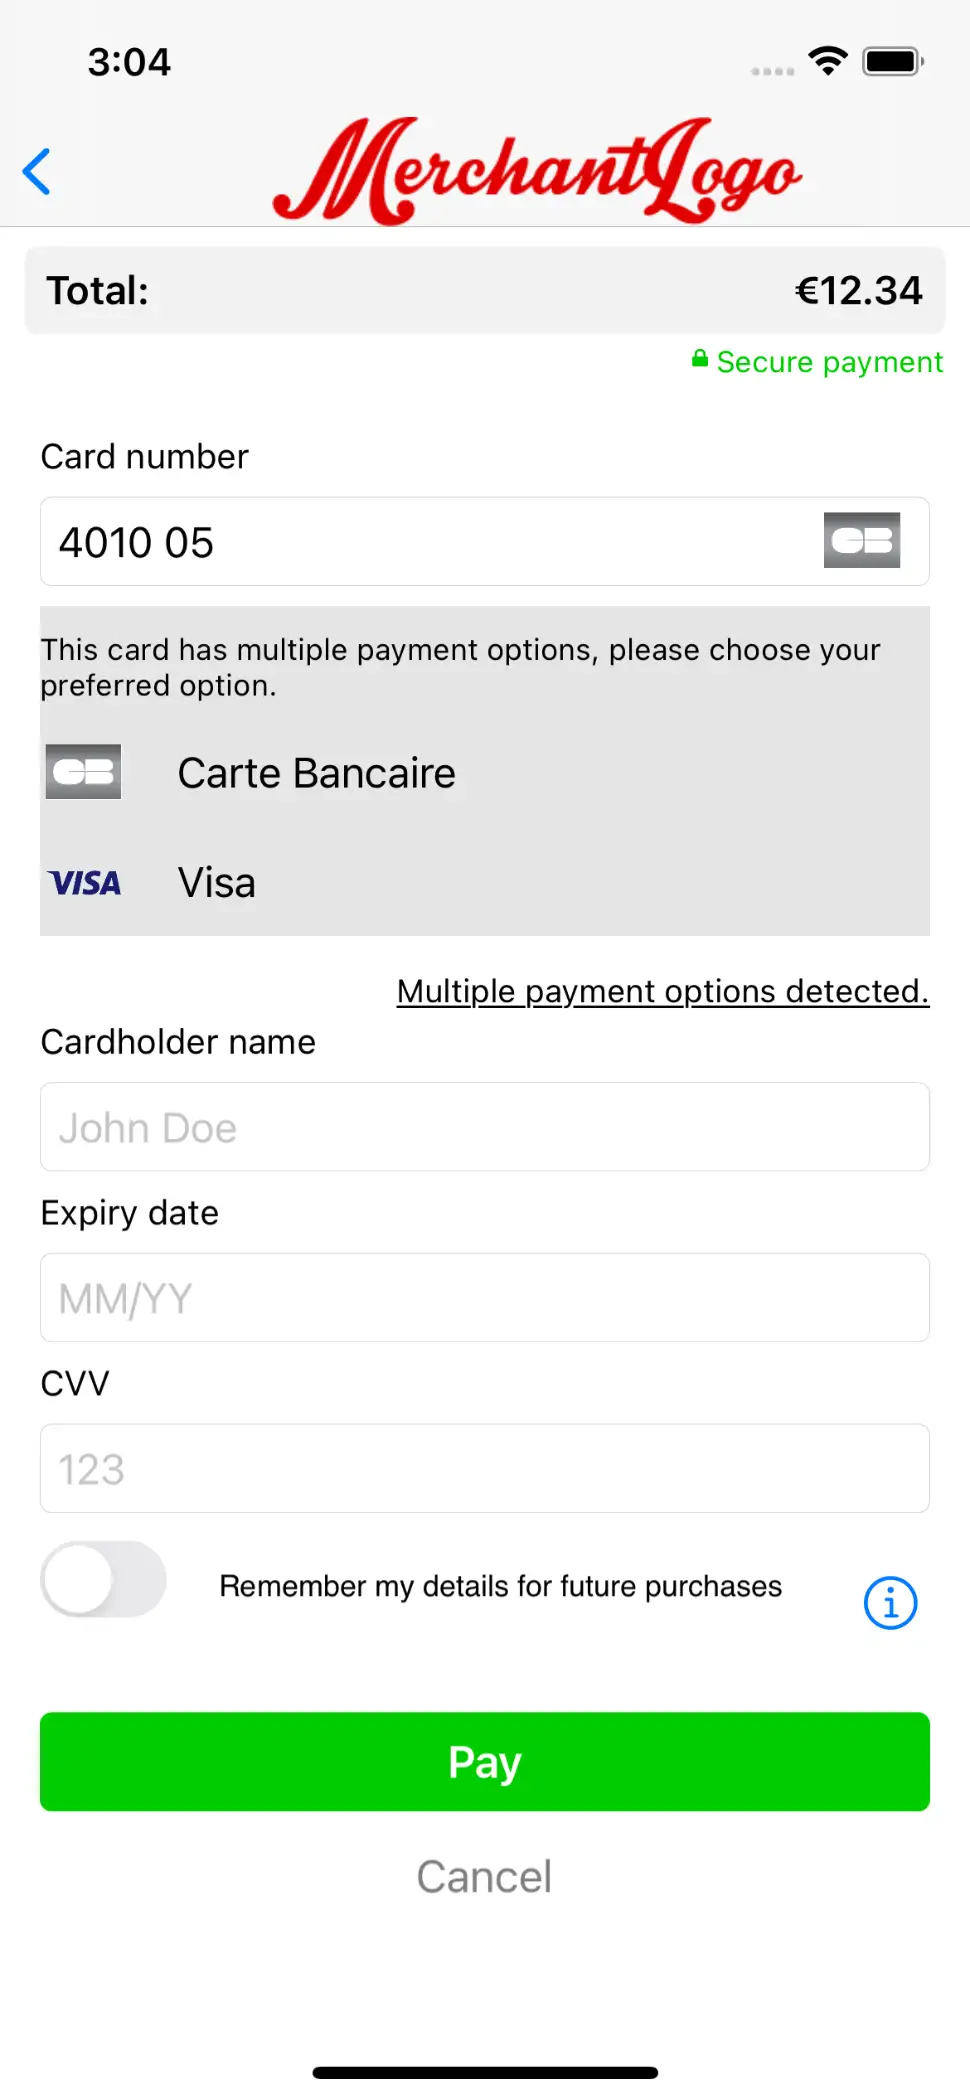
IIN check
The example application also demonstrates the use of the IIN check described above. For each of the card-based payment products, an IIN check is performed once the customer has entered six or more digits in the text field for the card number. If the IIN is associated to the selected payment product, the logo of this payment product appears on the right-hand side of the text field. If the IIN is associated to another payment product, the input fields are automatically replaced with the input fields for the new payment product.
The screenshot also shows how the co-brands that may be associated to a certain card may be rendered. The payment product logo and name of the co-brands are retrieved by doing specific calls for them.