Fraud Detection Module
Take a look at our newest state-of-the art fraud prevention tools featuring
- AI-powered risk scoring.
- Continuous machine learning optimisation.
- Device fingerprinting.
We offer both a plug-and-play version (Fraud Prevention Silver) or a highly adaptable solution (Fraud Prevention Gold). Refer to our dedicated guide to enroll for this exceptional service!
Introduction
The online payment landscape can be complex. Today, businesses need to move quickly to stay one step ahead of fraudsters. That’s why Direct has the perfect solution for you. Boost your business line of defense with our Fraud Detection Module (FDM). How? We offer you a flexible range of features that you can customise to suit your needs.
For example, you can:
- Block transactions by IP addresses or by location from where the cards were issued.
- Control and configure how 3-D Secure (3DS) transactions are handled if and when they go wrong.
- Easily set minimum and maximum limits per transaction, per card and/or per period.
Fight off fraudulent transactions in real-time and accept payment with confidence. Use our Fraud Detection Module today.
Before we begin
At the end of the guide, you will be able to do configure your 3-D Secure (also known as 3DS) settings of your payment methods, manage and set conditions for your transactions.
To get started, make sure that your FDM (ID: CAP) is activated. You can do this by going to Configuration > Account > Your options in your account. If it has not been activated, our support team is happy to help!
Manage 3DS settings
3-D Secure (3DS) is an anti-fraud protocol designed to enhance security for both you and your customers.
Manage 3DS settings
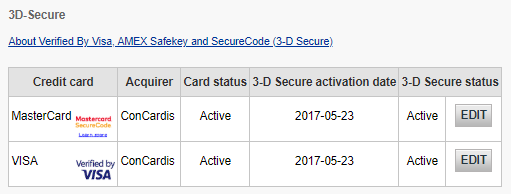
Once your fraud subscription is active, you can now configure your 3DS settings. Go to Advanced > Fraud Detection. 3DS will have to be configured individually for each payment method. Under 3-D Secure, select a payment method by clicking on EDIT. You will see a list of actions that you can choose from.
The table below provides an overview on actions listed on the page and what they mean.
| Actions | Explanation |
|---|---|
|
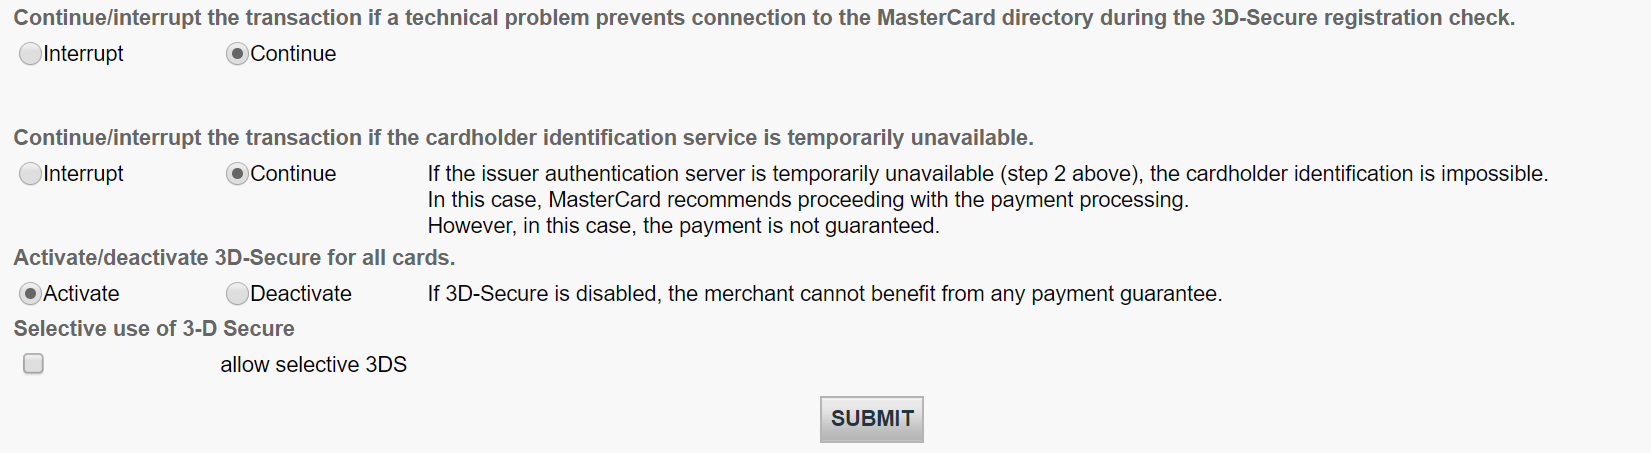
Continue/interrupt the transaction if a technical problem prevents connection to the directory during the 3D-Secure registration check. |
You may want to do configure this option if 3-D Secure is unavailable for any of these reasons. Choosing "Continue" will significantly reduce your conversion rate due to SCA regulations. Read our dedicated guide to learn more. |
|
Continue/interrupt the transaction if the cardholder identification service is temporarily unavailable. |
|
|
Activate/deactivate 3D-Secure for all cards. |
Choosing "Deactivate" will significantly reduce your conversion rate due to SCA regulations. Read our dedicated guide to learn more. |
|
Process 3-D Secure after the Global Fraud Score. |
3-DS will be processed based on your fraud settings and our Fraud Expert assessment if it has been activated. |
Set conditions for Merchant Fraud lists
Merchant Fraud lists are lists that allow you to set conditions for your payments. For example, you may want to block illegitimate transactions based on their IP addresses or even the card’s country of issue! In this chapter, you will learn how to manage these lists.
There are two types of lists.
- Whitelists allow you set conditions for when a transaction should be accepted.
- Blacklists allow you to set conditions for when a transaction should be blocked.
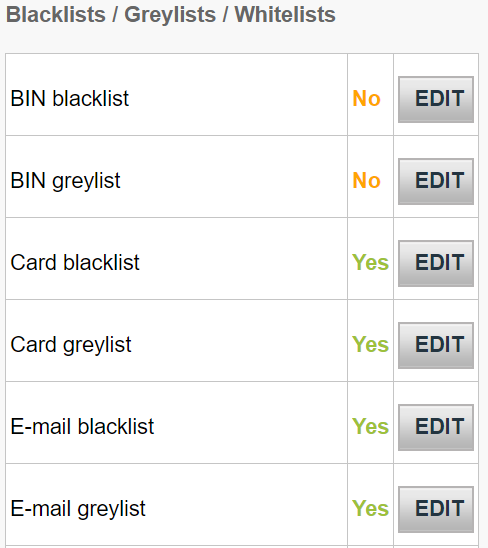
View lists
View these lists by going to Advanced > Fraud Detection in your account. Under Blacklist / Greylist / Whitelist, select an item that you would like to configure and click EDIT.
Manage lists
If a transaction matches any of the conditions that you have set on these lists, it will be then accepted or blocked accordingly.
Depending on the action that you choose to take, you might also need to send some parameters to our platform. Below is an overview of the list types (which are conditions you can set), what they mean and parameters that would need to be sent.
| List type | Explanation | Parameters to be sent |
|---|---|---|
|
Card blacklist |
You will need the full credit card. For Direct debits, you will need the full bank account. |
cardPaymentMethodSpecificInput.card.cardNumber |
|
|
A Bank Identification Number (BIN) consists of the first six digits of a credit card linked to an issuer in a specific country. This allows you to block all credit cards that share the same BIN. |
cardPaymentMethodSpecificInput.card.cardNumber |
|
IP blacklist |
Our system will accept both specific IPs or IP ranges according to the formatting a.b.c-d.0-255 or a.b.c-d.* or a.b.c.d-e. |
fraudFields.customerIpAddress This property is deprecated. Use order.customer.device.ipAddress instead. |
|
IP address whitelist |
Our system will accept both specific IPs or IP ranges according to the formatting a.b.c-d.0-255 or a.b.c-d.* or a.b.c.d-e. |
fraudFields.customerIpAddress (For Server-to-server, this is the buyer’s IP address). This property is deprecated. Use order.customer.device.ipAddress instead. |
Add new items to a list
If you would like to add items to one of the list types above, select the respective list type and click EDIT.
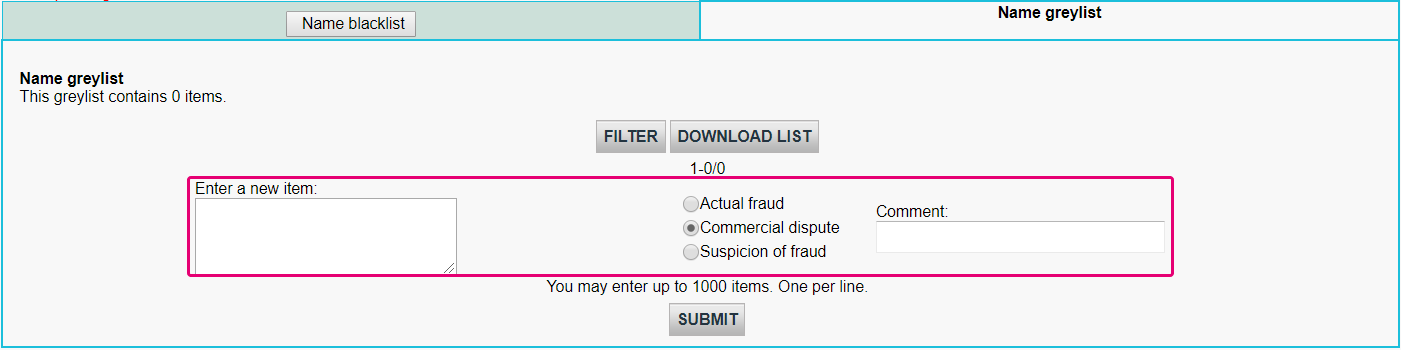
To add items to a list,
- Enter data in the Enter the item.
- Select either Actual Fraud / Commercial Dispute / Suspicion of Fraud.
- Optional: Add some information in the Comment field if you have any.
Manage existing list items

If you would like to manage items in a list, you can either:
- Delete: Remove one or more items by flagging All.
- Fraud type: Modify the original entry to FRA (Actual Fraud) / COM (Commercial Dispute) / SOF (Suspicion of Fraud).
- Comment: Delete or change the original comment of your item by clicking on "...".
Our platform also allows you to put already processed transactions to this list. To do so, follow these steps:
- Log in to the Back Office. Go to Operations > View transactions and look up the transaction.
- In the table displaying all maintenance operations for this transaction, click on any Pay ID button.
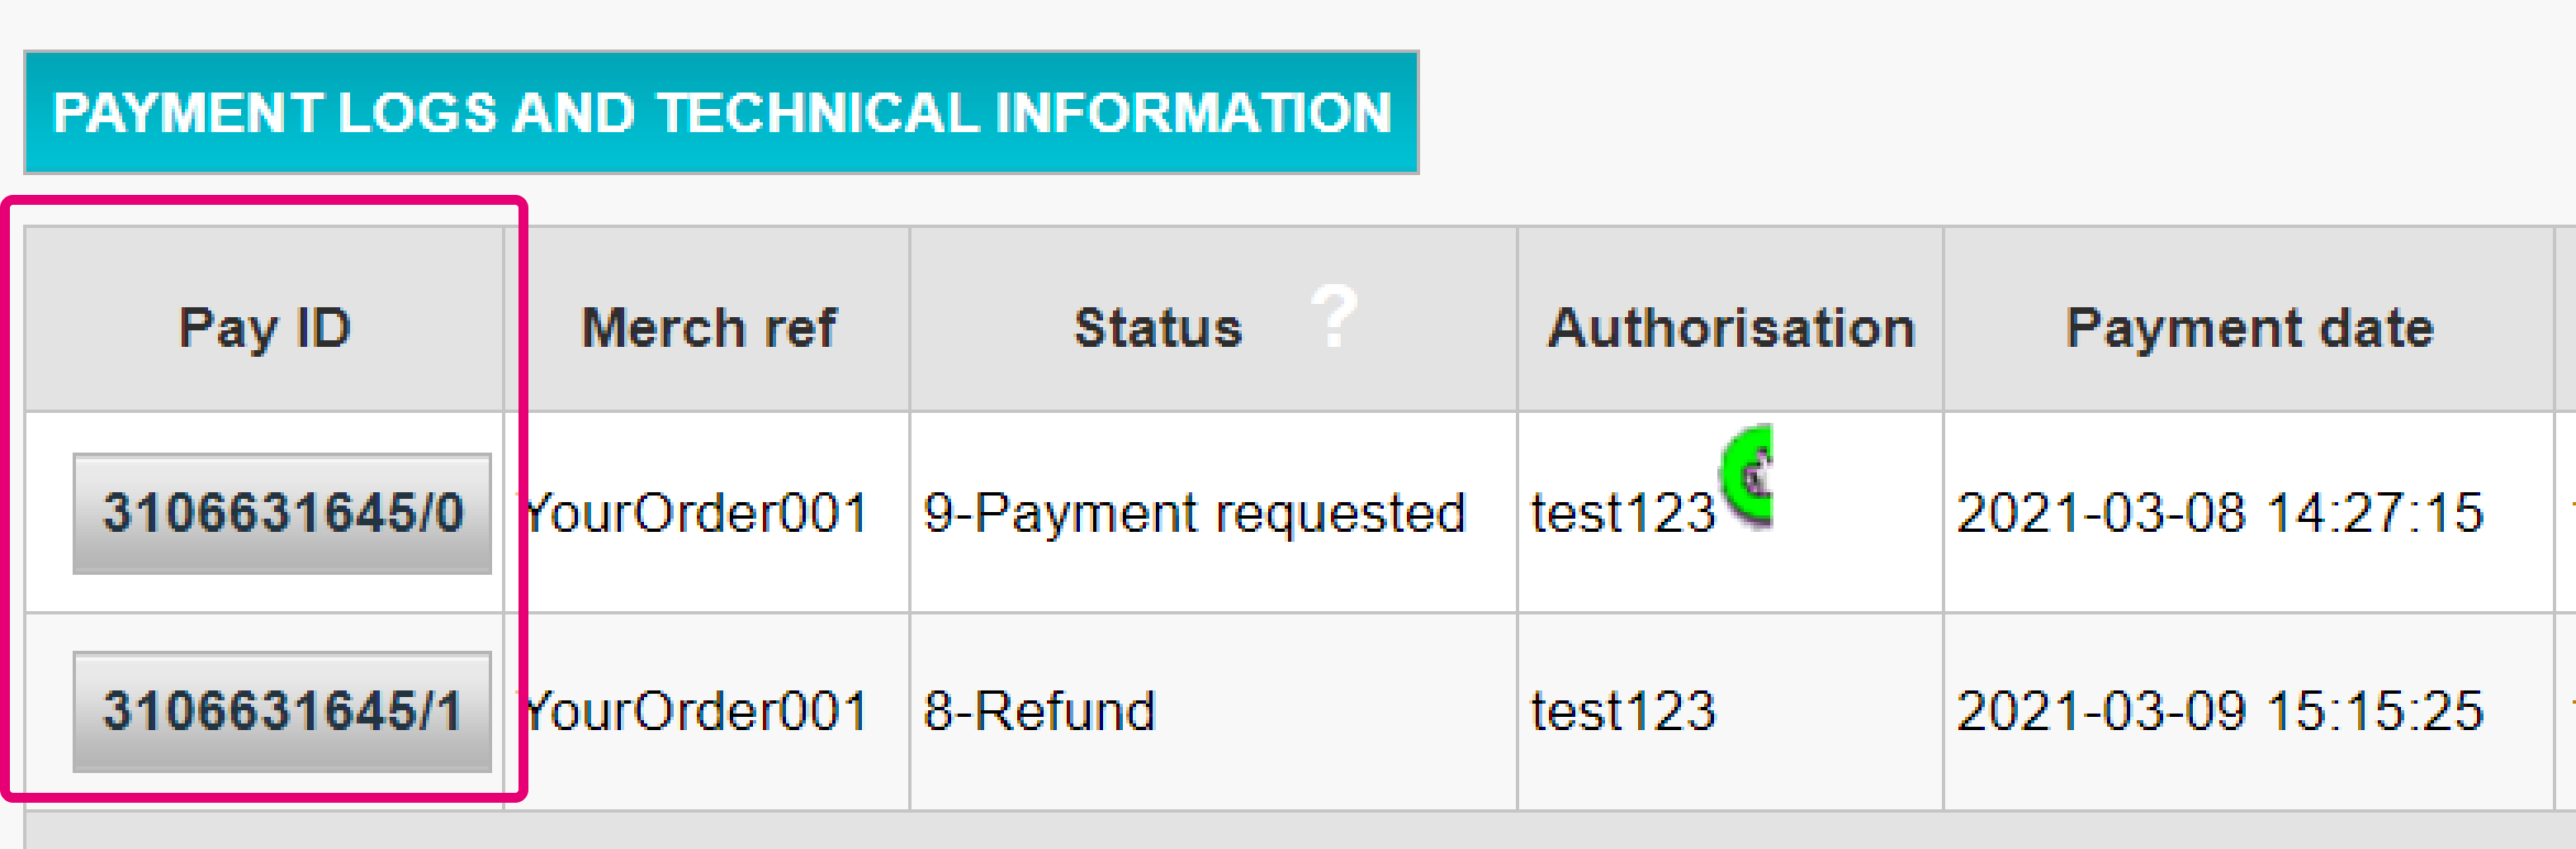
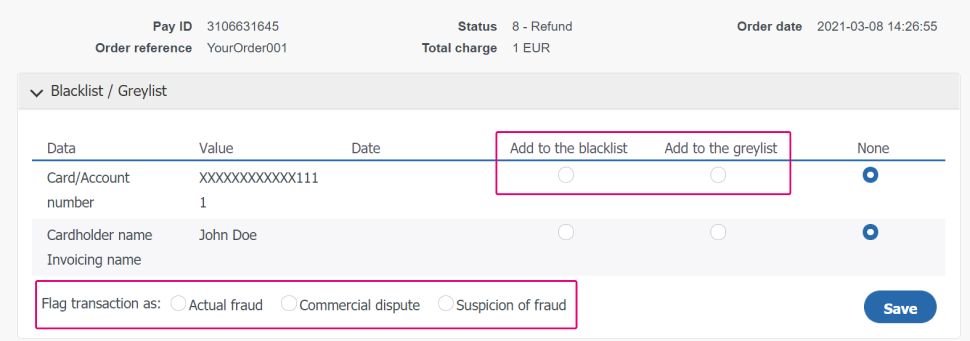
- On the maintenance operation overview page, click on the “DISPUTE” button.
- In the table, select either “Add to the blacklist” / “Add to the greylist” for any of the selectable transaction parameters. Flag then transaction as either "Actual fraud” / “Commercial dispute" / "Suspicion of fraud". Confirm your selection by clicking on the "Save" button.
Manage fraud detection rules
With fraud detection rules, you can set purchase amount limits for transactions that go through your webshop. This chapter will teach you how you can set and manage these rules in your account.
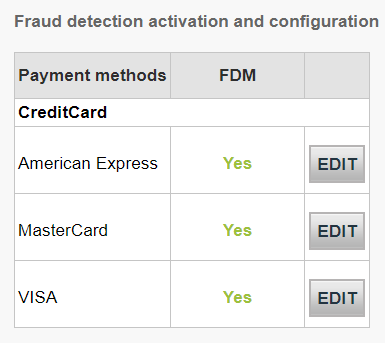
Go to Advanced > Fraud Detection. Under Fraud detection activation and configuration, choose a payment method that you would like to configure by clicking on EDIT.
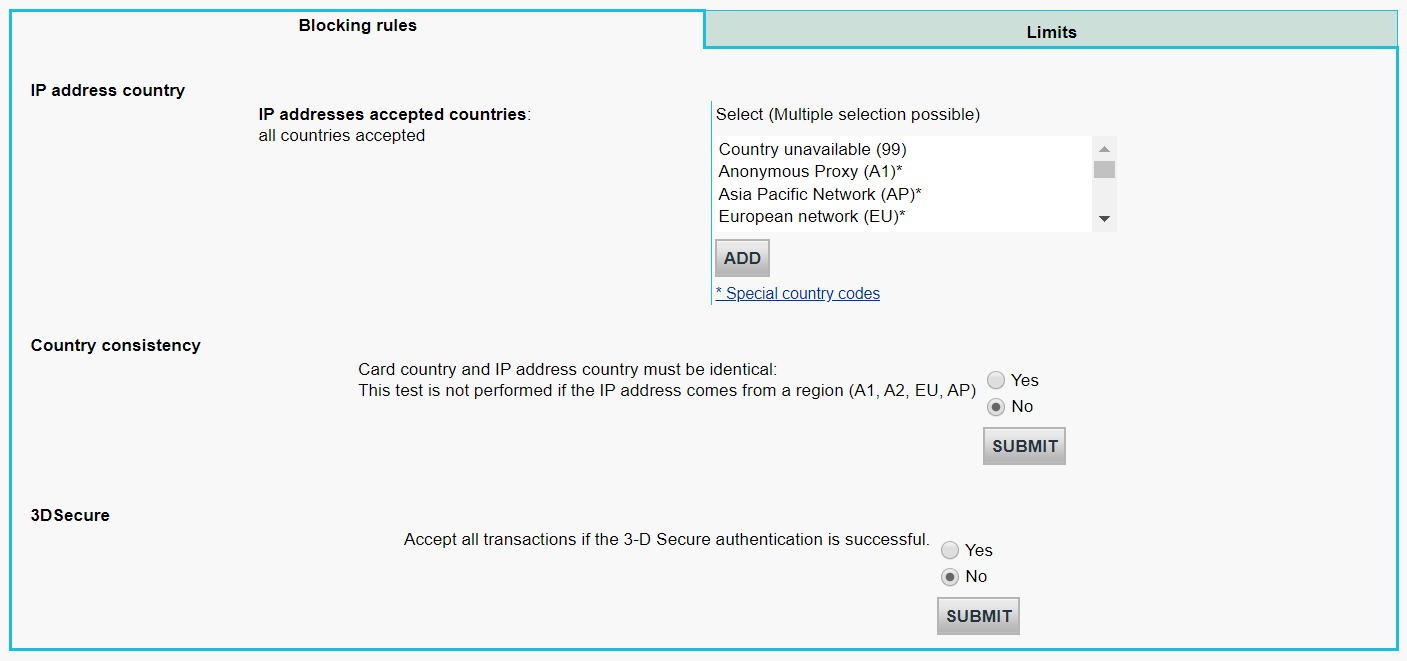
On the page, you will be able to define blocking rules and limits. Depending on your blocking rules and limits, you may need to send additional parameters to our platform.
Configure limits
View the limits by clicking on the Limits tab.
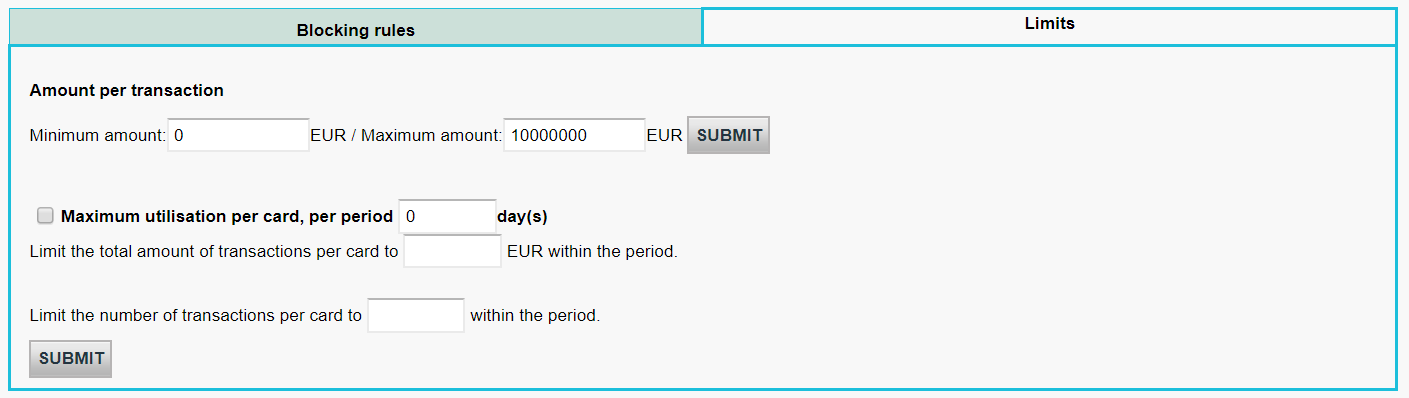
Below is an overview of the limits that you can configure and what they mean.
| Limits | Explanation |
|---|---|
|
Limit the minimum and/or maximum amount that can be spent per transaction. |
Transactions that go above or below these limits will not be accepted. |
|
Limit the total amount in EUR that can be spent per card within a period defined by you. |
Card usage limit is based on the number of successful transactions during the defined period. |
|
Limit the total amount of transactions that can be made within a period defined by you. |
Card usage limit is based on the cumulative amount during the defined period. |
Send Fraud parameters in transaction requests
Once you have set the conditions for the Fraud lists and the Fraud rules in the Back Office, you are now ready to link them to transaction requests you send to our platform.
The actual Fraud check covers two steps:
- Add the properties in the fraudfields object that are relevant to either of the list(s) and/or rules to a CreatePayment/CreateHostedCheckout request. A typical request looks like this:
{ "cardPaymentMethodSpecificInput": { "card": { "cvv": "451", "cardNumber": "4012005616165343", "expiryDate": "1221", "cardholderName": "Wile E. Coyote" }, "isRecurring": false, "paymentProductId": 1, "transactionChannel": "ECOMMERCE", "threeDSecure": { "externalCardholderAuthenticationData": { "cavv" : "AAABBEg0VhI0VniQEjRWAAAAAAA=", "cavvalgorithm": "0", "directoryServerTransactionId" : "f25084f0-5b16-4c0a-ae5d-b24808a95e4b", "eci" : "7", "threeDSecureVersion" : "2.1.0" } } }, "fraudFields": { "customerIpAddress": "5.204.5.55" }, "order": { "amountOfMoney": { "currencyCode": "EUR", "amount": "100" }, "customer": { "billingAddress": { "countryCode": "NL" } }, "references": { "merchantOrderId": 123456, "merchantReference": "oGPc8xJURfpFitBa6ORrpkBuPoGpvD" } } } - Our platform compares the fraudfields properties with what you have configured in the Back Office. If there is a match, our platform will block or accept the transaction.
- A blocked transaction due to (suspected) Fraud reaches statusCode=2.
- Object CardPaymentMethodSpecificOutput.FraudResults of a GetPayment requests contains detailed information about why a transaction has been accepted/blocked.
7. Understand transaction error codes
If our platform rejects a transaction and puts it to status 2, we always provide an error code. This code provides you with detailed information about the rejection. Consult our Troubleshooting guide to refine your Fraud module settings for higher conversion rate!